
DIY JEWELRY STAND
- Brit
- Jun 7, 2022
- 3 min read


Let's start by saying this jewelry stand is ridiculously easy to create and takes very little time. I made mine a few summers ago and then, in classic Brit fashion, never shared it. Luckily, I did take some photos of the process though, so let's gather everything you'll need!
TOOLS:
Tape measure
Hand saw
Clamps
Drill
1/8" and 1/16" drill bits
Pencil
MATERIALS:
12x3.5" base
Super glue
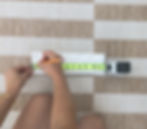


First, let me say that you can use pretty much whatever you want for the base. I used a leftover piece of solid surfacing from our kitchen remodel, but you could also use a piece of wood or even a clay or cement tile. Just make sure that if you use something harder like clay or cement, you get the appropriate type of drill bit. As far as measurements go, mine measured 12x3.5 inches, so the center position for the holes at the ends was 1.75 inches. If you use a 12x3" tile, the center will be 1.5 inches. Just make sure that whatever size you use, the holes are both centrally located and an inch away from either end of the base like in the pics above. Once you've marked the spot for each hole, drill them out (with your 1/8" drill bit) for the brass rod and set it aside for now.

Next, you'll cut your round wooden dowel down to 11" with your hand saw and then clamp it down so you can drill holes a 1/2" away from both ends with your 1/8" bit. Once you get the holes drilled, you'll set aside the dowel and gently bend your brass rod as shown above. Slide each end of the brass rod through the holes in the dowel so that it looks like the image below.


Set it aside and cut two 8.5" pieces from your 1/4" square wooden dowel. Find the center of each piece and use your 1/8" drill bit to drill a hole in both. This is where you'll slide the pieces onto the brass rod. Turn both pieces so the holes can't be seen from the top view and drill four sets of holes for four pairs of earrings on each side of both dowels with your 1/16" drill bit, leaving about an inch or so between the sets in the middle of each.


Now you're going to slide both of the square dowels onto the left side of the brass rod as seen above. I stopped short of where I wanted each one and put a dab of super glue on the rod above both and then slid them up into place. Set it down for a few minutes to give the super glue time to dry without accidentally moving the dowels.


Lastly, you're going to add a bit of super glue to the holes on the base and push both sides of the brass rod into them so they're nice and snug. And that's it!

Hang your necklaces, add your earrings, stand back and admire your handiwork! For dangly earrings that won't thread through the holes because there's a bend in the post (like the long sparkly ones on the bottom rack), I just drape them over the top. For necklaces without a clasp, I also just drape them and then pull it through itself to secure it.
Anyway, I'd love it if you'd let me know how you feel about this DIY in the comments! Thanks for reading y'all!